
A blinking light on your Shark vacuum isn’t just an annoyance, it’s your machine trying to tell you something. Whether you’re seeing a flashing white light or a blinking indicator, ignoring it usually leads to poor suction, incomplete cleaning, or a vacuum that quits mid-job. The good news is that most Shark cordless vacuum lights flashing or blinking are fixable without calling a repair technician. Understanding what those indicator lights mean and how to troubleshoot them quickly gets your vacuum back to peak performance. This guide walks you through the most common causes and practical fixes you can do yourself in about 15 minutes.
Table of Contents
ToggleKey Takeaways
- A blinking light on your Shark vacuum signals a maintenance need, most commonly a full dust cup, clogged filter, or airway blockage that can be fixed in 15 minutes without professional help.
- Empty the dust cup after every use or at the halfway mark, check and rinse your filter monthly, and inspect the brush roll and hose weekly to prevent most blinking light issues before they occur.
- Most Shark vacuum light blinking problems stem from neglected maintenance rather than defects—establishing a simple routine of dust cup emptying, filter cleaning, and weekly checks keeps your machine running at peak performance.
- If the blinking light persists after emptying the dust cup, cleaning the filter, clearing the brush roll, and inspecting intake ports, consult your owner’s manual as it may indicate an internal sensor or mechanical issue requiring service.
- For cordless Shark vacuums, proper battery maintenance prevents performance drops that trigger false alerts—charge fully before first use, avoid complete drain, and replace the battery every 2–3 years for optimal suction.
Understanding Shark Vacuum Indicator Lights
Shark vacuums come equipped with indicator lights designed to alert you to maintenance needs before they become bigger problems. A steadily lit light usually means everything is operating normally, while a blinking or flashing light signals that attention is required. The exact meaning depends on your model, some use red lights for blockages, white lights for full dust cups, or amber for filter issues. Most modern Shark models feature a clear indicator system in the handle or near the dust cup area.
Before you panic about a broken vacuum, take a moment to locate your model number (typically on a sticker on the back or underside) and check the owner’s manual or the manufacturer’s website for specific light indicators. Different Shark cordless vacuum models have slightly different light codes, so knowing your exact model prevents unnecessary troubleshooting. Many newer Shark vacuums also include a quick-reference guide printed on the machine itself, so check there first. Understanding these signals empowers you to address issues immediately rather than letting them compound into more serious mechanical problems.
Common Reasons Your Shark Vacuum Light Is Blinking
Full Dust Cup
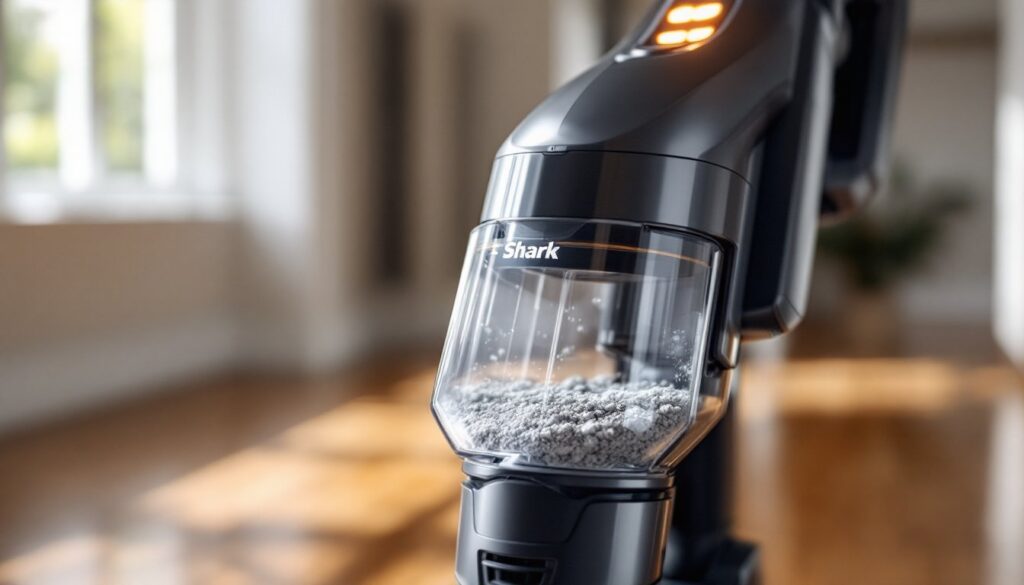
The most frequent culprit behind a blinking light on Shark vacuum models is a full dust cup. These vacuums are designed to alert you before the cup reaches absolute capacity, preventing debris from spilling back onto your floors. When the cup fills past the recommended level, suction drops and the motor works harder, which triggers the indicator. Emptying the dust cup is the quickest fix, simply pop it off, empty it into a trash bin, tap out any remaining debris, and reattach. If the light still blinks after emptying, there’s likely another issue at play.
Clogged Filter
A clogged or dirty filter is the second most common reason for a blinking light on your Shark vacuum. The filter traps fine dust and allergens, but over time it becomes matted and restricts airflow. When airflow drops below normal levels, the vacuum’s sensor detects the pressure change and triggers the warning light. Check your filter every 30 days if you vacuum frequently or have pets. HEPA filters (the standard on most Shark models) should be tapped out gently over a trash can and rinsed with cool water once a month. Let it air-dry completely, at least 24 hours, before reinstalling. Never wash the filter in hot water or run it through a dishwasher, as this damages the filter media.
Blockages in the Airway
Debris trapped in the vacuum’s airway path creates the same suction loss that a clogged filter does, and the sensor responds by triggering the blinking light. Hair wrapping around the brush roll, sock fibers caught in the intake, or crumbs lodged in the hose all reduce airflow and trigger the alert. Check the brush roll for tangled hair (you’ll often see it wrapped around the bristles) and use scissors or a seam ripper to cut it free. Inspect the hose by holding it up to a light source and looking through it for visible blockages. A straightened coat hanger or plumbing snake pushed through a blocked hose usually clears debris. If you suspect a blockage deeper in the unit, disconnect all removable components and visually inspect the intake ports and suction pathways.
Step-by-Step Troubleshooting Guide
Start with the simplest fix first and work your way through more involved checks. This approach saves time and prevents unnecessary disassembly.
Step 1: Empty the Dust Cup
Turn off and unplug your vacuum. Press the release button on the dust cup and pull it straight down and away from the unit. Tap the cup firmly over a trash bin to dislodge all loose debris. Wipe the interior walls of the cup with a dry cloth to remove fine dust coating. Reattach the cup by aligning it with the unit’s body and pushing up until you hear or feel a click.
Step 2: Check and Clean the Filter
Locate the filter housing (usually accessed from the top or side of the unit). Remove the filter according to your model’s instructions, most twist out or pop free. Tap it gently against the inside of a trash can to remove loose dust. Rinse with cool running water: use a soft brush to gently agitate stubborn buildup but don’t scrub aggressively. Allow it to air-dry in a warm location for at least 24 hours before reinstalling. Many Shark vacuum models require the filter to be completely dry to function properly.
Step 3: Inspect the Brush Roll and Hose
Unplug the vacuum and flip it over or access the underside according to your model. Look at the brush roll for hair wraps or fiber entanglement. Trim away any wrapped material with scissors. Turn your attention to the main hose and any removable tubing, hold it up to light and look for blockages. Disconnect the hose and run warm water through it or push a plumbing snake through from one end. A flashlight pointed through the hose helps you spot stubborn clogs.
Step 4: Clear Intake and Airway Ports
Many Shark vacuums have small intake ports near the dust cup or around the motor housing. Use a flashlight to inspect these areas for debris. A small, flexible brush or old toothbrush works well for gently clearing dust and fibers from tight spaces. Don’t use sharp objects that might damage seals or delicate components. Reassemble all parts, plug in the unit, and test it. The blinking light should now be off. If it persists after completing all four steps, consult your owner’s manual or contact Shark’s customer service, there may be an internal sensor issue or a mechanical fault requiring professional service.
Maintenance Tips to Prevent Future Blinking Lights
Most Shark vacuum light issues stem from maintenance being delayed rather than from manufacturing defects. Establishing a simple routine keeps your machine running smoothly and prevents the frustration of sudden blinking lights mid-cleaning.
Regular Dust Cup Emptying
Empty the dust cup after every use or when it reaches the halfway mark, whichever comes first. A full cup reduces suction immediately and forces the motor to work harder, shortening the machine’s lifespan. If you’re vacuuming a large area, empty the cup halfway through the job. This habit takes 30 seconds and prevents most blinking light scenarios.
Filter Maintenance Schedule
Tap out your filter every two weeks if you use the vacuum 2-3 times per week, or monthly for lighter use. Deep rinse it monthly. If you have pets or allergies, consider replacing the filter every 6-12 months instead of just cleaning it, a new filter restores suction better than a repeatedly washed one. Mark your calendar or set a phone reminder to keep yourself on schedule.
Weekly Brush Roll and Hose Checks
After vacuuming, quickly check the brush roll for hair wraps and remove any visible tangles. Inspect the main hose for clogs by holding it up to light. This 2-minute weekly check catches problems before they trigger warning lights. Shark vacuum troubleshooting guides often recommend this habit to prevent sensor-triggered alerts.
Battery and Charging Care (Cordless Models)
If you own a Shark cordless vacuum, proper battery maintenance prevents performance drops that might appear as electrical issues. Charge the battery fully before first use and don’t let it drain completely. Store the vacuum with a partially charged battery, not fully drained. Replace the battery every 2-3 years if your model allows it, as battery degradation reduces suction and can confuse sensors into false alerts.
Annual Deep Cleaning
Once a year, disassemble your vacuum more thoroughly than the weekly routine. Clean all intake ports, inspect seals for cracks or deterioration, and rinse hoses with warm soapy water. Check that all connections are tight and that no small debris has lodged in hard-to-reach areas. This preventive approach catches potential issues before they become problems, and cleaning experts recommend this practice as essential for vacuum longevity.