
A deck railing kit offers homeowners an efficient, affordable way to add safety and style to their outdoor space without the headache of sourcing individual components. Whether you’re building a new deck or upgrading an aging one, a complete deck railing kit bundles all the necessary posts, balusters, brackets, and fasteners into a ready-to-assemble package. This approach saves time, reduces material waste, and ensures your railing meets local building codes, something that matters both for safety and resale value. In 2026, the variety of materials and design options has expanded significantly, making it easier to find a kit that fits your budget, maintenance tolerance, and aesthetic preferences. This guide walks you through selecting, installing, and maintaining a deck railing kit so your project finishes strong.
Table of Contents
ToggleKey Takeaways
- Deck railing kits simplify the installation process by bundling all necessary components—posts, balusters, brackets, and fasteners—into a single coordinated package that meets local building codes and saves time and money.
- Material choice directly impacts maintenance: wood offers warmth and affordability but requires annual sealing, composite eliminates maintenance at a 50–70% higher cost, while aluminum provides 25+ years of durability with minimal upkeep.
- Proper installation hinges on five critical steps—inspecting components, preparing the rim, leveling posts, securing rails, and spacing balusters exactly 4 inches apart—ensuring safety and code compliance.
- Long-term railing performance depends on regular maintenance: wooden decks need biennial sealing, composite requires soap-and-water cleaning, and metal railings need occasional polishing and fastener checks to prevent corrosion.
- Before purchasing a deck railing kit, verify local building codes, assess your maintenance tolerance, and allow materials 48–72 hours to acclimate to temperature and humidity to prevent gaps and buckling after installation.
What Are Deck Railing Kits and Why Homeowners Choose Them
A deck railing kit is a pre-packaged system containing all the structural and cosmetic components needed to enclose your deck’s perimeter. Typically, kits include vertical posts, horizontal rails, balusters (the vertical spindles), hardware like brackets and bolts, and sometimes a small tube of touch-up paint or stain. The real advantage is convenience: instead of buying lumber or materials piecemeal and hoping your measurements align, you get a coordinated set designed to work together.
Homeowners choose deck railing kits for several practical reasons. First, they simplify material ordering, no guessing quantities or making multiple trips to the supplier. Second, kits usually come with clear documentation showing baluster spacing and post placement, which directly addresses code requirements. Most jurisdictions require balusters spaced no more than 4 inches apart (a sphere rule: a 4-inch sphere cannot pass through) and a railing height between 36 and 42 inches, depending on your deck height. A quality kit takes this legwork out of your hands. Third, bundled pricing often undercuts buying components separately, especially for composite or aluminum kits where individual pieces carry markup. Finally, kits appeal to DIYers because they reduce the risk of costly mistakes, you’re working with a tested design rather than improvising.
Types of Deck Railing Kits Available
Wood, Metal, and Composite Options
Wood railing kits remain the most traditional choice and often the most affordable entry point. Typically made from pressure-treated Southern yellow pine or cedar, wooden kits offer warm aesthetics and can be customized with stain or paint. The downside: wood requires annual inspection for rot, regular sealing (every 2–3 years), and eventual balusters or rail replacement. A wooden kit works well if you enjoy maintenance or live in a drier climate where rot risk is lower.
Composite deck railing kits combine wood fiber and plastic resin, eliminating the need for staining or sealing. Brands like Trex and TimberTech dominate this category. These kits cost roughly 50–70% more than wood but save hours of maintenance over a 10-year lifespan. Composite doesn’t rot, splinter, or require annual sealing, making it ideal for busy homeowners or coastal properties where moisture is constant. The trade-off: composite can discolor slightly in intense sunlight and may feel less “warm” aesthetically to some folks.
Aluminum and steel kits offer the lowest maintenance and modern aesthetics. These metal options work beautifully for contemporary homes and require only occasional cleaning. They’re pricier upfront but last 25+ years with virtually zero maintenance. Many aluminum kits feature glass or metal mesh panels for unobstructed views, a major selling point for decks overlooking scenery. Resources like This Old House showcase metal railing systems in high-end renovations, and you’ll see why designers favor them for visibility and durability.
Key Factors to Consider Before Buying
Budget, Maintenance, and Local Building Codes
Budget is the obvious first filter. A basic wooden railing kit for a 12-by-12 deck runs $300–600, while composite can jump to $1,200–2,000, and aluminum may hit $2,500 or beyond. Don’t forget installation labor if you’re hiring someone: deck railing installation typically costs $50–150 per linear foot once materials are accounted for. Set your total budget first, then work backward to material type.
Maintenance tolerance often tips the decision. If you dread annual sealing and staining, composite or metal is worth the upfront premium. If you enjoy seasonal deck care and prefer the natural look of wood, a wooden kit makes sense. Honestly assess your track record: if your fence has weathered gray because you skipped stain, wood railings will frustrate you.
Local building codes cannot be ignored. Your municipality sets baluster spacing, railing height, and load requirements. Some jurisdictions require a licensed electrician if you add post lights, or a permit before installation. Contact your local building department, a 10-minute phone call saves weeks of rework. Resources like Fine Homebuilding provide deep dives into code-compliant framing, though always verify against your local IRC (International Residential Code) adoption.
Material acclimation matters too. Wood and composite expand and contract with temperature and humidity. Leave materials in your yard for 48–72 hours before installation so they adjust to local conditions. This prevents gaps and buckling later. Installation guides sometimes skip this step: don’t.
Step-by-Step Installation Guide for DIY Enthusiasts
Before you start, gather your tools: a drill-driver, circular saw or miter saw, level, tape measure, square, impact driver, and safety gear (eye protection, work gloves, and a dust mask). Most kits require basic carpentry: advanced joinery is rare.
Step 1: Inspect and Plan. Lay out all kit components on a flat surface and cross-check the parts list. Measure your deck rim board carefully, this is where posts attach. Mark post locations per the kit’s layout, ensuring they align with existing deck structure (typically every 4 feet, but verify your kit specs). Use a chalk line to snap centerlines where each post will stand.
Step 2: Prepare the Rim. Sand any rough areas where posts will sit. If the rim is weathered, clean it with a wire brush. Posts must sit flush against a solid surface: no gaps. A slightly uneven rim? A shim (thin wooden wedge) corrects minor height issues, don’t force it.
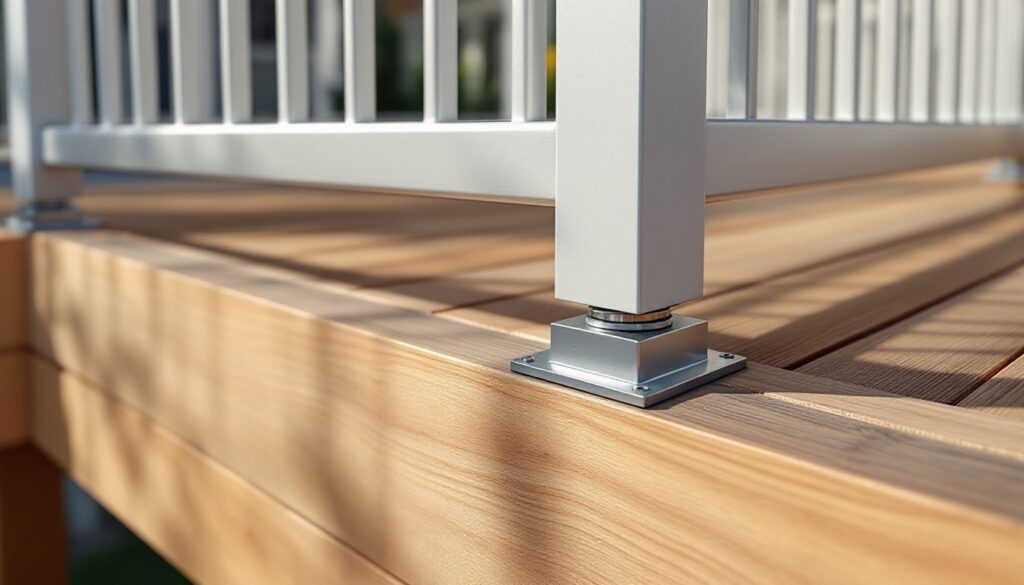
Step 3: Install Posts. Position the first post against the rim and level it side-to-side and front-to-back. Drill pilot holes to prevent splitting (especially important with wood kits), then drive lag bolts or through-bolts per the kit instructions. Over-torque is tempting but cracks wood: snug, not white-knuckle. Repeat for all posts. Instructables has detailed photo walkthroughs of similar railing projects if you get stuck on post anchoring.
Step 4: Attach Rails. Horizontal rails (typically top and bottom, sometimes middle) connect posts and provide railing structure. Use provided brackets or dadoes (slots routed into posts to receive rails, check if your kit uses these). Rail-to-post connections must be rock-solid: this is where DIYers often under-tighten fasteners.
Step 5: Install Balusters. Balusters slide or bolt between rails. Measure the spacing carefully, 4-inch rule is non-negotiable, and mark positions with a pencil before installing. Use shims to maintain consistent gaps. This is tedious but essential for safety and appearance.
Step 6: Final Inspection and Finish. Once assembled, give the entire railing a hard push, it should not flex or rattle. Any movement means a loose bolt or bracket. Touch up paint or stain per the kit instructions. Walk away, take a break, then inspect again the next day with fresh eyes.
Maintenance Tips for Long-Lasting Railing Performance
Maintenance needs depend entirely on material. Wooden deck railing kits need annual inspection before winter. Check for soft spots (sign of rot), cracks, or loose fasteners. Every 2–3 years, reapply exterior stain or sealant: clean with a deck cleaner first to remove algae and dirt. Replace any balusters that fail, a single rotten spindle compromises safety.
Composite railings require minimal work. Clean annually with mild soap and water. If algae or mildew appears (common in humid climates), a soft brush and deck cleaner work well. Avoid abrasive scrubbers: they dull the finish. Composite doesn’t need sealing, which saves enormous time.
Metal railings need occasional washing with appropriate cleaner (stainless steel polish for steel, specific aluminum cleaner for aluminum) and a drying cloth to prevent water spots. In coastal areas, saltwater accelerates corrosion: rinse more frequently. Check bolted connections annually and tighten any loose fasteners with an appropriate wrench.
Universal tips: Inspect fasteners twice yearly, especially after harsh winters or storms. Loose bolts cause rattle and eventual failure. If you notice baluster cracks or a wobbly post, address it immediately, railings are load-bearing under code, and deferred repair becomes a safety issue. Document any repairs or replacements (photos, dates) for insurance and future resale conversations. Most quality deck railing kits last 15–25 years with proper care: some, like aluminum, last much longer. The investment compounds when you’re not replacing railings every five years due to neglect.