
A freestanding bathroom vanity with sink offers homeowners a flexible alternative to built-in cabinetry, combining style, functionality, and storage without permanent installation. Whether you’re renovating a small powder room, updating a master bath, or designing a new space, freestanding vanities provide easier installation, simpler repairs, and the freedom to reconfigure your layout down the road. They work equally well in modern minimalist bathrooms, farmhouse designs, and transitional spaces. This guide walks you through selecting, installing, and maintaining a freestanding bathroom vanity that fits your home’s needs and aesthetic.
Table of Contents
ToggleKey Takeaways
- A freestanding bathroom vanity eliminates the need for wall framing, drywall patching, or stud relocation, making installation simpler and more cost-effective than built-in cabinetry.
- Freestanding vanities create visual lightness in small bathrooms by exposing floor space, making tight spaces feel larger while keeping repair access easier from underneath.
- Measure your bathroom twice and identify existing plumbing rough-in locations before purchasing a freestanding vanity to avoid costly additional plumbing work.
- Select materials and finishes based on moisture resistance—solid hardwoods, quality veneers with waterproof coatings, or durable laminates will outperform inferior finishes in humid bathroom environments.
- Maintain your freestanding vanity by wiping surfaces daily, checking supply lines and P-traps every six months, and running the exhaust fan during and after showers to prevent moisture damage.
- Most freestanding vanities come in standard heights (28–36 inches) and widths (18–72 inches), with quality options ranging from $300–$2,000, offering flexibility for small powder rooms to master baths.
What Makes Freestanding Vanities Different From Built-In Options
Key Design and Installation Advantages
Freestanding vanities sit on legs or a pedestal base and connect to plumbing through exposed supply lines and drain tailpieces, rather than being framed into a wall cavity. This approach eliminates the need to cut into studs or drywall, which means no drywall patching, no stud relocation, and significantly fewer headaches when plumbing runs change.
From a practical standpoint, freestanding units are portable. If you decide to rearrange your bathroom or move to a new home, you can take the vanity with you (provided plumbing connections allow it). Repairs are also simpler, you can access pipes from underneath without removing cabinetry. Built-in vanities require that cabinetry be torn out or partially disassembled if a P-trap or supply line fails.
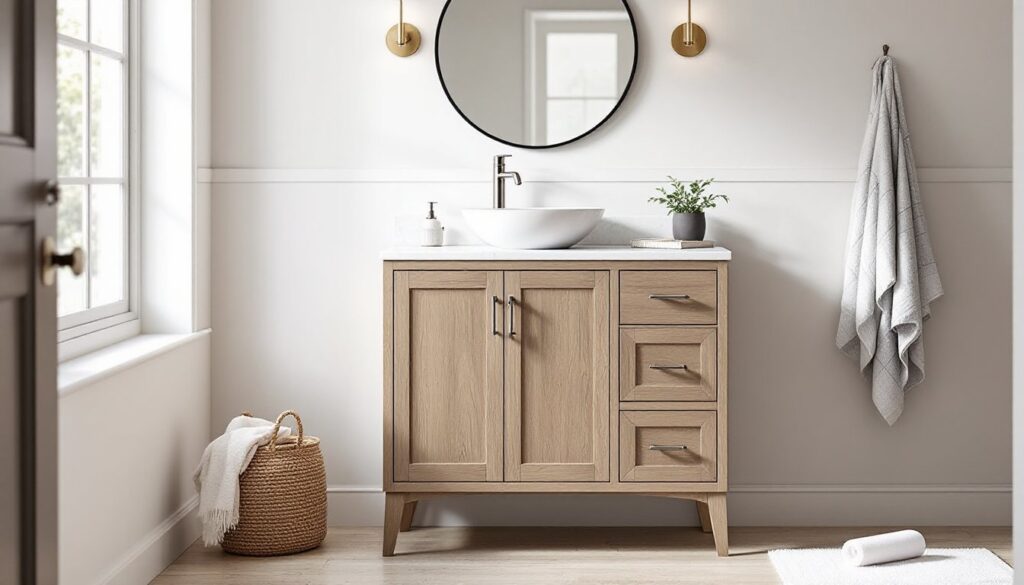
Design-wise, freestanding vanities create visual lightness in small bathrooms by exposing floor space beneath the unit. This open-floor look makes tight spaces feel larger and allows for easier cleaning underneath. Built-in vanities, by contrast, use that under-sink space for storage and cabinetry, which can make a small bathroom feel crowded. Modern freestanding vanities come in heights ranging from 28 to 36 inches (standard ADA-compliant height is 34 inches), widths from 18 to 72 inches, and depths of 18 to 24 inches, so you can find a proportion that suits your bathroom layout without custom building.
Costs also differ. A quality freestanding vanity typically runs $300–$2,000 depending on materials and finish, while built-in cabinetry often exceeds $1,500 and requires professional installation or significant carpentry skills. That said, freestanding units may require additional plumbing work if your current rough-in doesn’t align with the vanity’s drain and supply locations.
Choosing the Right Size and Style for Your Bathroom
Measure your bathroom twice. Take the width between walls, note the distance from the far wall to any fixtures (toilet, tub edge, door swing), and check the height of nearby windows or tile lines. A standard vanity is 21 inches deep, but compact models run 16–18 inches if floor space is tight. For a small bathroom, a 24-inch-wide vanity is often the sweet spot: master baths or dual-sink layouts typically call for 48–60 inches.
Drainage and supply rough-in locations matter enormously. Before you buy, identify where your existing water supply lines and drain enter the wall or floor. If they’re centered at 18 inches from the wall and your new vanity expects them at 24 inches, you’ll need additional plumbing work, a task worth getting an estimate on before committing to a specific model.
Style comes down to your home’s aesthetic. Transitional vanities with clean lines and minimal ornamentation pair well with contemporary or mid-century modern bathrooms. Farmhouse or rustic designs feature beadboard, shiplap details, or distressed finishes and work beautifully in cottages and country-style homes. For a more decorative look, consider vanities with turned legs, raised-panel doors, or applied molding. Gallery sites like Remodelista showcase curated vanity styles across design categories, helping you visualize how different finishes and silhouettes work in real bathrooms.
Don’t overlook storage. Freestanding vanities typically include one or two drawers and a lower shelf or cabinet space. If your bathroom lacks wall storage, prioritize vanities with deeper drawers and internal dividers to maximize organization. Single-sink vanities work for guest bathrooms: master baths with two users benefit from double-sink models (typically 48 inches or wider).
Popular Materials and Finishes to Consider
Wood remains the most common freestanding vanity material. Solid hardwoods like oak, maple, and cherry resist moisture better than soft woods but cost more. Many mid-range vanities use plywood or medium-density fiberboard (MDF) with veneer, a cost-effective choice if sealed properly with multiple coats of finish. The key is ensuring the cabinet box has a waterproof or moisture-resistant coating: inferior finishes will swell or delaminate within a few years in a humid bathroom.
Laminate and thermofoil finishes (vinyl-wrapped MDF) are durable, easy to clean, and budget-friendly but harder to repair if damaged. Some vanities incorporate metal bases, glass shelving, or stone-topped surfaces for a higher-end feel. Quartz, granite, or marble countertops cost $600–$1,500+ but offer exceptional durability and elegance. Cultured marble is a lighter-weight, more affordable alternative.
Finish color should complement your tile, walls, and fixtures. White and cream vanities brighten small spaces and work with nearly any design. Gray, navy, and black offer contemporary style and hide water spots better than lighter finishes. Natural wood stains (honey, walnut, espresso) bring warmth and depth. Double-check that your choice of finish, whether glossy, matte, or satin, fits the overall aesthetic: glossy finishes appear more formal, while matte finishes read casual and contemporary.
For DIYers interested in building their own, Ana White’s free woodworking provide step-by-step designs using basic lumber and standard plumbing fixtures. This approach costs $150–$400 in materials but demands solid carpentry skills and proper finishing to ensure water resistance.
Installation Tips and Plumbing Considerations
Before delivery, confirm that your bathroom doorways and hallways are wide enough for the vanity to pass through. A 30-inch-wide vanity fits standard doorways: larger units (48–72 inches) may require temporary removal of doors or careful angling.
Set the vanity in place and check for level using a torpedo level across the front and sides. Unlevel vanities cause drain backs, water pooling, and drawer misalignment. Shim under the legs or base with composite shims (wood shims can absorb moisture and rot) until the unit sits perfectly level. Many vanities have adjustable feet: turn them as needed before shim placement.
Plumbing comes next. You’ll need a flexible supply hose (¼-inch for hot and cold water) and a P-trap assembly for the drain. The P-trap connects under the sink bowl to the wall or floor drain. If your existing rough-in doesn’t align with the vanity’s drain hole, you’ll need to extend or relocate the supply lines and tailpiece, this is where a plumber’s input saves money and prevents leaks. Hand-tighten all connections first, then snug each nut by another ¼ turn with a wrench: over-tightening cracks fittings.
Before sealing or caulking, test for leaks by running water and checking underneath for drips. Let water sit in the bowl for five minutes, then inspect again. Once you’re confident everything is dry, apply a small bead of silicone caulk (not acrylic, which fails in wet areas) where the vanity top meets the wall, but leave the underside uncaulked so any future leaks are visible.
Faucet installation varies by type. Most vanities ship with a pre-drilled countertop: line up your faucet base, insert supply tails from below, and secure the faucet with the mounting nut. Connect hot and cold supplies using compression fittings or push-to-connect fittings (the latter are forgiving for beginners). If you’re uneasy with plumbing, call a licensed plumber for supply and drain connections: labor typically runs $150–$300 and ensures code compliance. Resources like Fix This Build That offer detailed plumbing project walkthroughs for DIYers building or customizing vanities.
Styling and Maintenance for Long-Lasting Appeal
Style the area around your freestanding vanity to enhance its impact. A small mirror above the vanity, sconces flanking the sides, and a single plant or accessory on the counter elevate the space without clutter. The open floor beneath the vanity is an opportunity, a low woven stool, a rolled bath mat, or a small storage basket adds function and visual interest while keeping the floor clear for cleaning.
Maintenance keeps your vanity looking new and prevents moisture damage. Wipe down the countertop and exterior after daily use to prevent water spots and soap residue buildup. Use a microfiber cloth on wood finishes: paper towels can scratch. For weekly cleaning, a damp cloth with mild soap and water is sufficient. Avoid harsh chemicals (bleach, acetone) that strip finishes: opt for pH-neutral wood cleaners if needed.
Inside the cabinet, ensure drawers dry fully if water splashes occur. Keep a small absorbent mat under the sink to catch slow drips before they damage the cabinet bottom. Check supply lines and the P-trap every six months for corrosion or weeping: catching small leaks before they soak the wood saves thousands in later replacement costs.
Sealing wood vanities annually with a marine-grade polyurethane or furniture wax protects against humidity. If your bathroom lacks a ventilation fan, moisture will eventually degrade even quality finishes: ensure your exhaust fan runs during and 20 minutes after showers. For vanities with marble or stone tops, use a stone sealer annually to prevent staining and etching from soap and toothpaste residue.
Conclusion
A freestanding bathroom vanity with sink strikes a balance between style, practicality, and ease of installation that few built-in options can match. By sizing correctly, choosing durable materials, handling plumbing thoughtfully, and maintaining your investment, you’ll enjoy a functional, beautiful bathroom fixture for years to come. Start with a clear measure of your space, identify your design preferences, and don’t hesitate to consult a plumber if rough-in locations require shifting. Your next bathroom refresh begins with finding the right freestanding vanity.